BGb123's Idea / Prospect
## Embracing CI/CD: Transforming Software Development
In today's fast-paced software development landscape, the demand for rapid delivery and high-quality applications has never been greater. Continuous Integration (CI) and Continuous Delivery/Deployment (CD) have emerged as essential practices that help teams meet these demands. This article explores the fundamentals of CI/CD, its benefits, and best practices for implementation.
### What is CI/CD?**
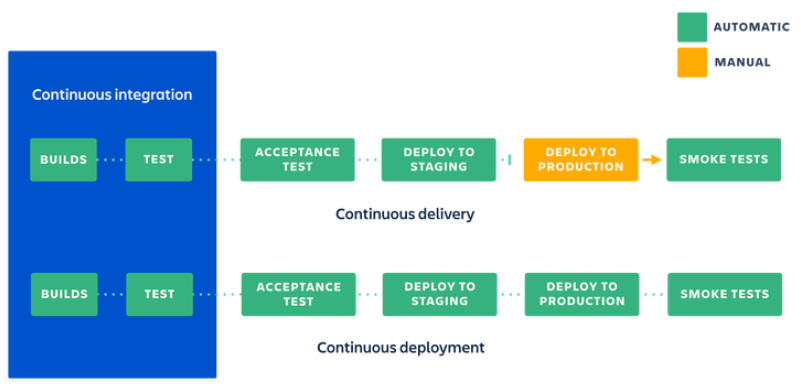
**Continuous Integration (CI)** is a development practice where code changes are automatically integrated into a shared repository several times a day. Each integration is verified by an automated build and testing process, allowing teams to detect errors quickly and improve software quality.
**Continuous Delivery (CD)** extends CI by ensuring that code changes are automatically prepared for a production release. This means that every change that passes automated tests can be deployed to production at any time, making the release process more predictable and less risky.
**Continuous Deployment** takes this a step further by automatically deploying every change that passes the tests to production, eliminating the need for manual intervention.
### Benefits of CI/CD
1. **Faster Time to Market**: By automating the integration and delivery processes, teams can release new features and updates more quickly, responding to customer needs and market changes in real time.
2. **Improved Code Quality**: Automated testing ensures that code changes are validated before they are merged, reducing the likelihood of bugs and improving overall software quality.
3. **Reduced Risk**: Smaller, incremental updates are easier to manage and roll back if issues arise. This minimizes the risk associated with large releases and helps maintain system stability.
4. **Enhanced Collaboration**: CI/CD fosters a culture of collaboration among development, operations, and quality assurance teams. Everyone works together towards a common goal of delivering high-quality software efficiently.
5. **Greater Customer Satisfaction**: With faster releases and higher quality, teams can better meet customer expectations, leading to increased satisfaction and loyalty.
### Key Components of CI/CD
1. **Version Control System (VCS)**: A VCS like Git is essential for managing code changes and facilitating collaboration among developers.
2. **Automated Build Tools**: Tools such as Jenkins, CircleCI, or GitHub Actions automate the process of compiling code and running tests, ensuring that changes are validated quickly.
3. **Automated Testing**: Implementing unit tests, integration tests, and end-to-end tests helps catch bugs early in the development process.
4. **Deployment Automation**: Tools like Kubernetes, Docker, and cloud services enable automated deployment to various environments, ensuring consistency and reliability.
5. **Monitoring and Feedback**: Continuous monitoring of applications in production allows teams to gather feedback and address issues proactively.
### Best Practices for Implementing CI/CD
1. **Start Small**: Begin with a single project or team to implement CI/CD practices. Gradually expand to other projects as the team gains experience.
2. **Automate Everything**: Aim to automate as many processes as possible, including builds, tests, and deployments. This reduces manual errors and speeds up the workflow.
3. **Maintain a Clean Codebase**: Encourage developers to write clean, maintainable code and adhere to coding standards. This makes it easier to integrate changes and reduces the likelihood of bugs.
4. **Use Feature Flags**: Implement feature flags to allow for gradual rollouts of new features. This enables teams to test new functionality in production without impacting all users.
5. **Continuously Monitor and Improve**: Regularly review CI/CD processes and gather feedback from the team. Look for areas to optimize and improve efficiency.
### Conclusion
CI/CD is not just a set of tools; it’s a cultural shift that transforms how software is developed and delivered. By embracing CI/CD practices, organizations can achieve faster delivery, improved quality, and greater collaboration among teams. As the software landscape continues to evolve, adopting CI/CD will be crucial for staying competitive and meeting the ever-changing demands of customers.
In the end, the journey to CI/CD is an ongoing process of learning and improvement, but the rewards are well worth the effort. Embrace the change, and watch your development process transform!
For seasoned software developers, the basics of SQL (Structured Query Language) might seem mundane. But beneath the surface of CRUD operations (Create, Read, Update, Delete) lies a powerful database language brimming with potential for complex data manipulation and analysis.
This blog post delves deeper into the advanced capabilities of SQL, showcasing its power in real-world scenarios.
Beyond the Basics:
We'll revisit the familiar example of a library management system. Imagine a scenario where you need to:
- Recommend books to users based on their borrowing history and genre preferences.
- Analyze trends in book borrowing patterns across different age groups.
- Identify overdue books and automate reminders for borrowers.
These tasks require going beyond simple CRUD operations.
Let's explore how SQL empowers us to handle such complexities..
1. Joins:
Joins are the cornerstone of retrieving data from multiple tables simultaneously. Imagine tables for Books, Authors, and Borrowers. By leveraging different types of joins (INNER JOIN, LEFT JOIN, etc.), we can fetch information like the author's name alongside the borrowed book title.
2. Aggregate Functions:
Functions like COUNT, SUM, AVG, etc., allow us to summarize data in meaningful ways. We can calculate the total number of books borrowed in a month or the average time it takes to return a specific genre of book.
3. Window Functions:
These functions operate on result sets within a single query. We can use them to rank books based on popularity (number of borrows) or identify the most frequent borrowers within a specific time period.
4. Views:
Views are virtual tables based on existing tables or queries. They offer a simplified data representation for specific user groups, enhancing security and maintainability. In our example, a separate view could display only borrowed books to library staff.
5. Stored Procedures:
Stored procedures are pre-compiled modules that encapsulate complex SQL statements. They promote code reuse, reduce redundancy, and enhance security by controlling access to underlying logic. We can create a stored procedure to automate sending overdue book reminders.
Code Snippet Breakdown (Refactored):
This section will highlight the refactored code, emphasizing how it demonstrates the concepts mentioned above. We can choose specific functionalities from the provided code, like searching for books by genre using joins or calculating overdue book statistics using aggregate functions.
Advanced Use Cases:
Lets see the.. real-world examples of how advanced SQL is used in various domains like:
- E-commerce: Analyzing customer purchase history and product recommendations.
- Financial Services: Detecting fraudulent transactions with complex queries.
- Data Science: Extracting and preparing data for further analysis in Python or R.
Hoping it will sharpen ur SQL Skills..if u have any Doudts regarding it.. feel free to ask on comment section
## Leveraging Emmet for Faster HTML Development
Tired of typing endless HTML tags? Meet Emmet, the productivity powerhouse that can revolutionize your web development workflow. This incredible tool transforms simple abbreviations into full-fledged HTML structures, saving you countless hours and reducing the risk of errors.
What is Emmet?
.png)
Emmet is a powerful code expansion tool that drastically speeds up HTML, CSS, and even JavaScript writing. It's like having a supercharged autocomplete feature on steroids. With Emmet, you can write less and achieve more, focusing on the logic and creativity of your project rather than the mundane task of typing out HTML elements.
### How Does Emmet Work?
Emmet operates on a simple yet effective principle: you provide a concise abbreviation, and Emmet expands it into the desired HTML structure. Here's a basic example:
Abbreviation: `div#container>h1+p#intro`Expanded HTML:
HTML
```
<div id="container">
<h1></h1>
<p id="intro"></p>
</div>
```
As you can see, Emmet not only creates the basic structure but also adds IDs and classes as specified in the abbreviation.
### Key Features and Benefits
- Rapid HTML Creation: Generate complex HTML structures with just a few keystrokes.
- Improved Efficiency: Save time and reduce repetitive tasks.
- Enhanced Code Readability: Create well-structured and organized HTML code.
- Reduced Errors: Minimize typos and syntax mistakes.
- Cross-Platform Compatibility: Works with most popular code editors and IDEs.
### Emmet Syntax Basics
To fully harness the power of Emmet, understanding its syntax is essential. Here are some fundamental elements:
- Element: Use element names like `div`, `span`, `p`, etc.
- ID: Precede an element with a `#` to assign an ID.
- Class: Precede an element with a `.` to assign a class.
- Child: Use `>` to create child elements.
- Sibling: Use `+` to create sibling elements.
- Multiplication: Use `*` to repeat elements.
- Text: Wrap text in quotes (single or double).
### Practical Examples
Let's explore some practical examples to illustrate Emmet's capabilities:
Creating a basic HTML structure:
```
html:5>head>title>My Page+body>div#container>h1#title>Hello, World!+p#intro>This is an introduction.
```
### Integrating Emmet into Your Workflow
To start using Emmet, you'll need a code editor or IDE that supports it. Popular options include Visual Studio Code, Sublime Text, Atom, WebStorm, and Brackets. Once you have a compatible editor, install the Emmet plugin or extension.
_fast forward.._
Emmet is an indispensable tool for any web developer looking to boost productivity and streamline the HTML creation process. By mastering its syntax and leveraging its features, you can significantly enhance your development workflow and create cleaner, more efficient code. Give Emmet a try and experience the difference it can make in your projects.
Have you tried Emmet yet? Share your experiences and tips in the comments below!
### How to Start Building a Project in C#

When embarking on a project in any programming language, the first questions that often come to mind are, “How do I start?” and “What initial steps are necessary?” This guide will help you start a project in C# efficiently.
**Setting Up Your Development Environment**
Before diving into coding, setting up your development environment is crucial. Here’s how to get started:
**Installing Visual Studio**
Visual Studio is the most comprehensive Integrated Development Environment (IDE) for C# development. Here’s how to install it:
1. **Download Visual Studio**
- Visit the [Visual Studio download page](https://visualstudio.microsoft.com/downloads/).
- Choose the version that suits your needs (Community, Professional, or Enterprise).
2. **Install Visual Studio**
- Run the installer.
- Select the necessary workloads for C# development:
- ASP.NET and web development for web applications.
- .NET Core cross-platform development for cross-platform applications.
- Desktop development with .NET for Windows desktop applications.
- Click **Install** and wait for the installation to complete.
**Installing Visual Studio Code**
If you prefer a lightweight editor, Visual Studio Code is an excellent choice. Here’s how to set it up:
1. **Download Visual Studio Code**
- Visit the [Visual Studio Code download page](https://code.visualstudio.com/Download).
- Download the installer for your operating system.
2. **Install Visual Studio Code**
- Run the installer and follow the instructions.
- Install the C# extension by OmniSharp from the Extensions marketplace.
**Creating a New Project**
Once your development environment is ready, you can create a new C# project.
**Using Visual Studio**
1. **Open Visual Studio**
- Click on **Create a new project**.
2. **Choose a Project Template**
- **Console App**: Ideal for simple command-line applications.
- **ASP.NET Core Web App (MVC)**: Suitable for building web applications following the Model-View-Controller pattern.
- **Blazor App**: For building interactive web UIs using C# instead of JavaScript.
- **ASP.NET Core Web API**: For creating RESTful APIs.
3. **Configure Your Project**
- Enter a project name and location.
- Select the framework version (usually the latest stable version).
- Click **Create**.
**Using Visual Studio Code**
1. **Open Visual Studio Code**
- Open the terminal (Ctrl + `) or navigate to View > Terminal.
2. **Install .NET SDK**
- If not already installed, download and install the .NET SDK from the [.NET download page](https://dotnet.microsoft.com/download).
3. **Create a New Project**
- Navigate to your desired project directory in the terminal.
- Use the `dotnet new` command to create a project:
- For a console app: `dotnet new console`
- For a web app: `dotnet new mvc`
- For a Blazor app: `dotnet new blazorserver` or `dotnet new blazorwasm`
- For a Web API: `dotnet new webapi`
4. **Open the Project**
- Use the `code .` command to open the current directory in Visual Studio Code.
**Running and Debugging Your Project**
**Running Your Project**
1. **Using Visual Studio**
- Click on the **Start** button or press F5 to run your project.
2. **Using Visual Studio Code**
- Open the terminal.
- Navigate to your project directory.
- Use the `dotnet run` command to run your project.
**Debugging Your Project**
1. **Using Visual Studio**
- Set breakpoints by clicking on the margin next to the line number.
- Click the **Start** button or press F5 to start debugging.
2. **Using Visual Studio Code**
- Set breakpoints by clicking on the margin next to the line number.
- Open the Run and Debug view (Ctrl+Shift+D).
- Click on **Run and Debug** or press F5.
**Conclusion**
Starting a C# project involves setting up your development environment, creating a new project, and understanding how to run and debug it. Whether you choose Visual Studio for a comprehensive IDE experience or Visual Studio Code for a lightweight editor, both provide the tools you need to build robust C# applications. By following these steps, you’ll be well on your way to developing your next C# project. Happy coding!
